EXPLODORAMA!
▶ Play now! — in the browser, on a phone or a computer.\
⏩ Try the next version — what is coming, built from main; may have rough edges.
A turn-based, mobile-first, rogue-like take on the 1985 NES bomb-laying classic. Every bomb counts down with your moves, so nothing happens until you act — and you can see exactly what will burn before you commit.
Status: early development. The board, bombs, lives, seven enemy types, coins, all seven charges (one carried at a time, used when you choose), a hidden gem on every level that offers a choice of power-ups, the shop every 3rd level, the exit, the 20-level run with its ending, sounds and vibration, and saving mid-run work. Curses and the Reaper enemy are planned — see PLAN.md.
Version: 0.2.0 (semver; 0.1.0 was the base release). The menu's bottom line shows it with the rules
version and the commit the game was built from (a link to it on GitLab, plus "plus local
changes" in a build with uncommitted changes) and a link to the
source code. Tapping the version, or the menu's Changes button, opens the list of
changes in every release, each with its date and, for most, a demo scene. A player who comes
back on a newer version is shown what came after the one they last played (kept in this
browser's localStorage) when the opening demo ends; a first visit, and a test URL, show nothing. Releases are git tags, made when Pavel decides a batch is ready; between
them, finished changes collect in UNRELEASED in src/changelog.ts, and
tagging moves them into a new release there and bumps version in package.json.
Two copies: the released game (/explodorama/, built from the latest git tag) and the next
copy (/explodorama-next/, built from main: tab title "EXPLODORAMA! (next)"). Deploy the
released one with npm run deploy (the latest git tag) and the next one with
npm run deploy:next (needs fuzzyworld-tools with --as). The menu opens with a box saying which
version this is (Official or Early adopter) and a button to switch to the other, with both
addresses (homepage and nextHomepage in package.json, through vite.config.ts into
src/channel.ts). A released copy only has the button, Try it early link and
teaser once it is built from a tag that includes them (0.2.0 or later). They share an
origin, so every localStorage key is per copy (storageKey in src/channel.ts);
only explodorama.earlyRuns is shared. The released copy also has a
Coming next list; runs finished on the next copy are marked Early adopter on its board.
Developer mode is separate and can be switched on in either.
Rules version: 43 (SIM_VERSION in src/sim/record.ts). It goes up by one
whenever a rule change would make an old run replay differently, independent of the release
version (one release can span several). A run saved under another rules version is not resumed,
and a seed gives the same dungeon only within one rules version.
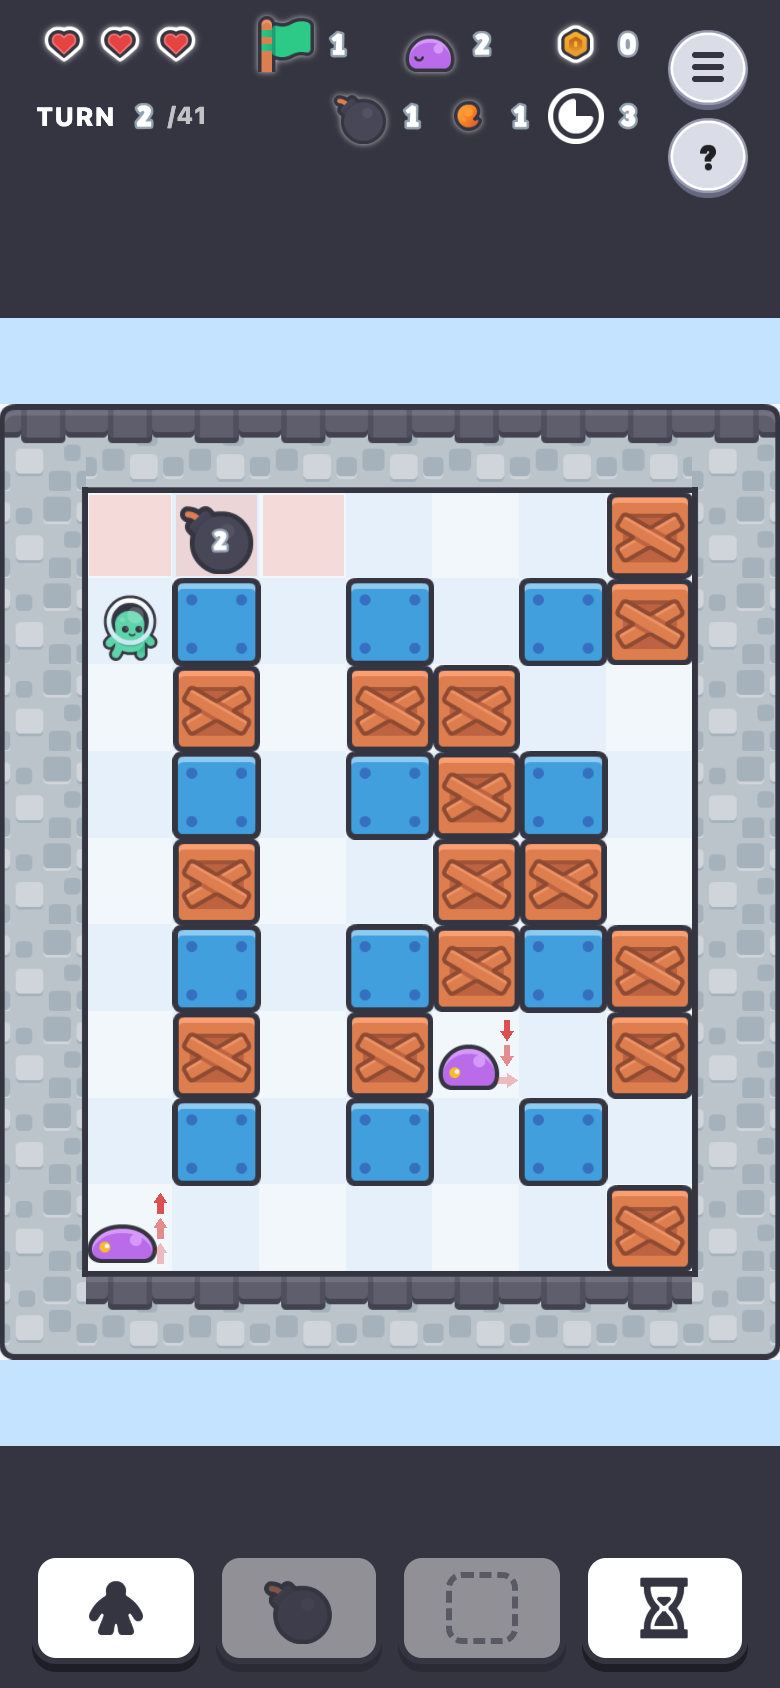
How to play
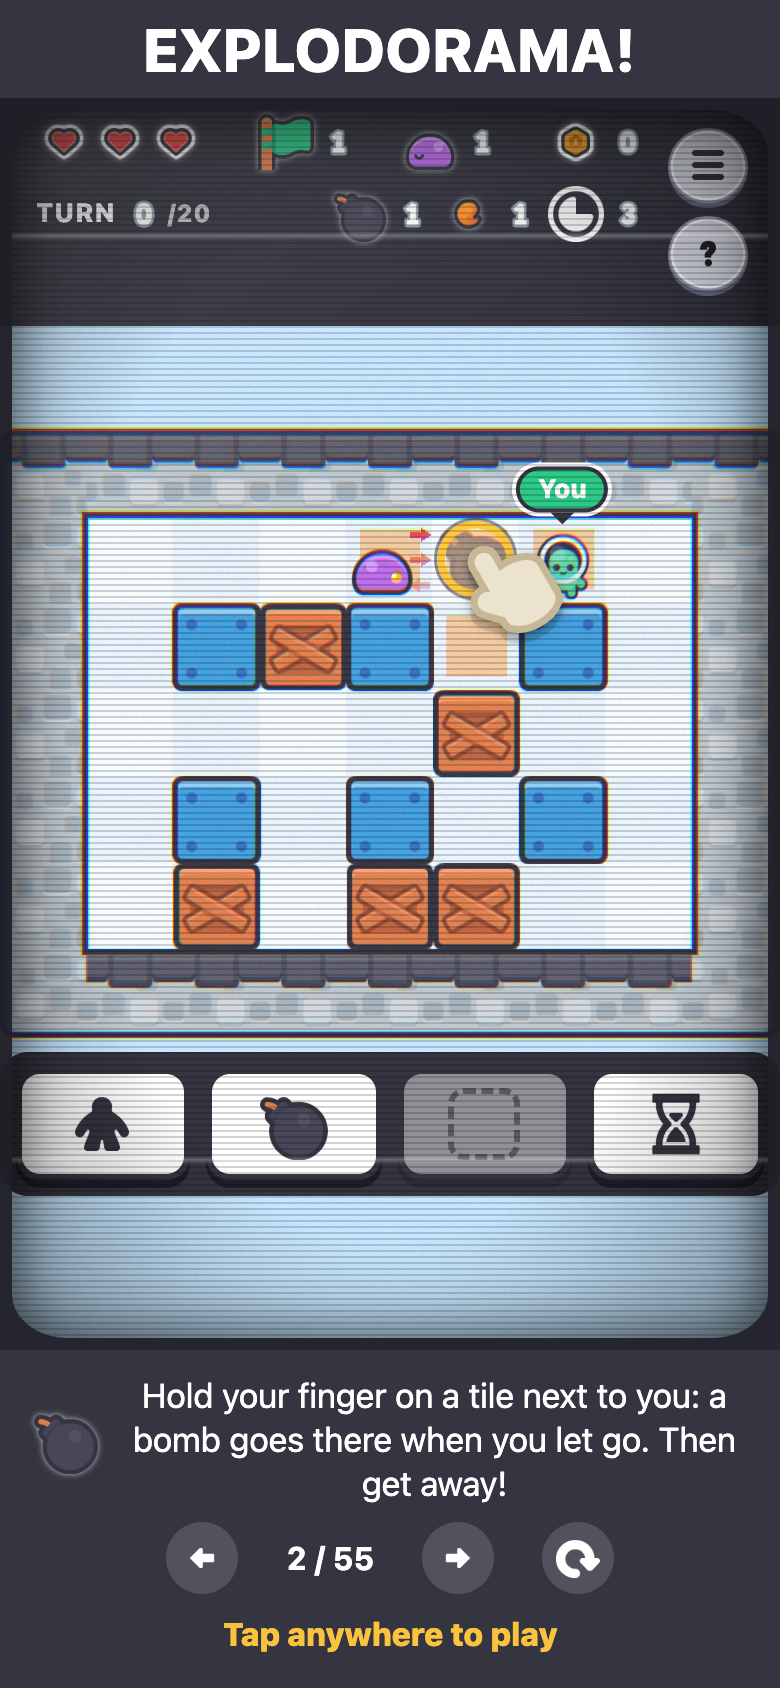
The demo: when the game opens, it first plays a demo — short scenes made up on the spot from
the real rules, each with a caption and an icon. The screen reads top to bottom: the title
EXPLODORAMA!, the TV with the scene, then the caption; both the title and the caption go
once the game starts. Each scene gets to its point quickly: what it is
about happens 3 to 6 turns in (more for a moment that takes longer to come, like rubble, with a turn or two after it), starting from a calm board (no bomb or flame yet). A finger shows
the controls as it plays every turn, on the real action bar (it sits right under the board,
apart from the caption at the bottom: what you play on, then what explains it): a tap on a tile (with a ripple
where it lands), a long press for a bomb (a ring closes in, the bomb's blast is previewed, the
bomb goes down when the finger lifts), a button and then a tile (Bomb then a tile; Move then two
tiles away for a Run), Wait, and Go. The player wears a green "You" tag over their head throughout, since it isn't otherwise obvious which of the
moving figures is you, and the finger appears beside the player at the start of each scene, so
your eye starts where the action is. The top bar shows throughout, as in play (each scene starts at turn 1 with no coins). It starts
with scenes about the controls alone: stepping, a bomb by long press, a bomb with the Bomb button,
waiting, auto-move (tap a far tile, then Go), a tour of the top bar (the finger points at
each item, ringed, while the caption says what it is: lives, level, enemies left, coins, turn
and par, bombs / blast / fuse, and the power-ups and charges you hold), and "What is that?"
(the finger taps ?, then an enemy; the real info dialog opens over the scene, leaving the
caption undimmed, and the finger taps Got it). The whole demo plays on an old CRT TV, as if
someone were playing on a touch-screen television: scan lines, a vignette, colour fringes and
faint static, a dark bar rolling down the screen and bright lines sweeping across it, and now and
then a burst of interference, as if someone switched a vacuum cleaner on nearby, rounded glass in a dark bezel, at most 4:3 wide with black bars beside it on a wide
screen — and the finger in front of the glass. The rest show every feature on the
board: bombs and their countdown, watching the enemies' arrows to bomb where they're going, a
narrow escape, chain reactions, lingering flame, the first three enemy types, drops, the gem, every
power-up you can see in action (Bomb +1, Fire +1, Fuse +1, Run, Kick — a tap on a bomb next to
you —, Throw, Diagonal, Slide, RPG, the Detonator — a tap on your bomb —, Proximity
alert, Wall / Bomb Pass,
Star), every charge (Pierce, Power, Nuke, Acid, Shield, Freeze, Decoy, ICBM, Flame Pass —
the ones you use, with the charge button), the board's objects (hiding in a bush, a bush fire
creeping on, flame stopping at a metal crate, an oil spill burning all at once, sliding along a spill, crossing spikes
while they're down, an oil barrel bursting and going off), the charge swap (carrying a
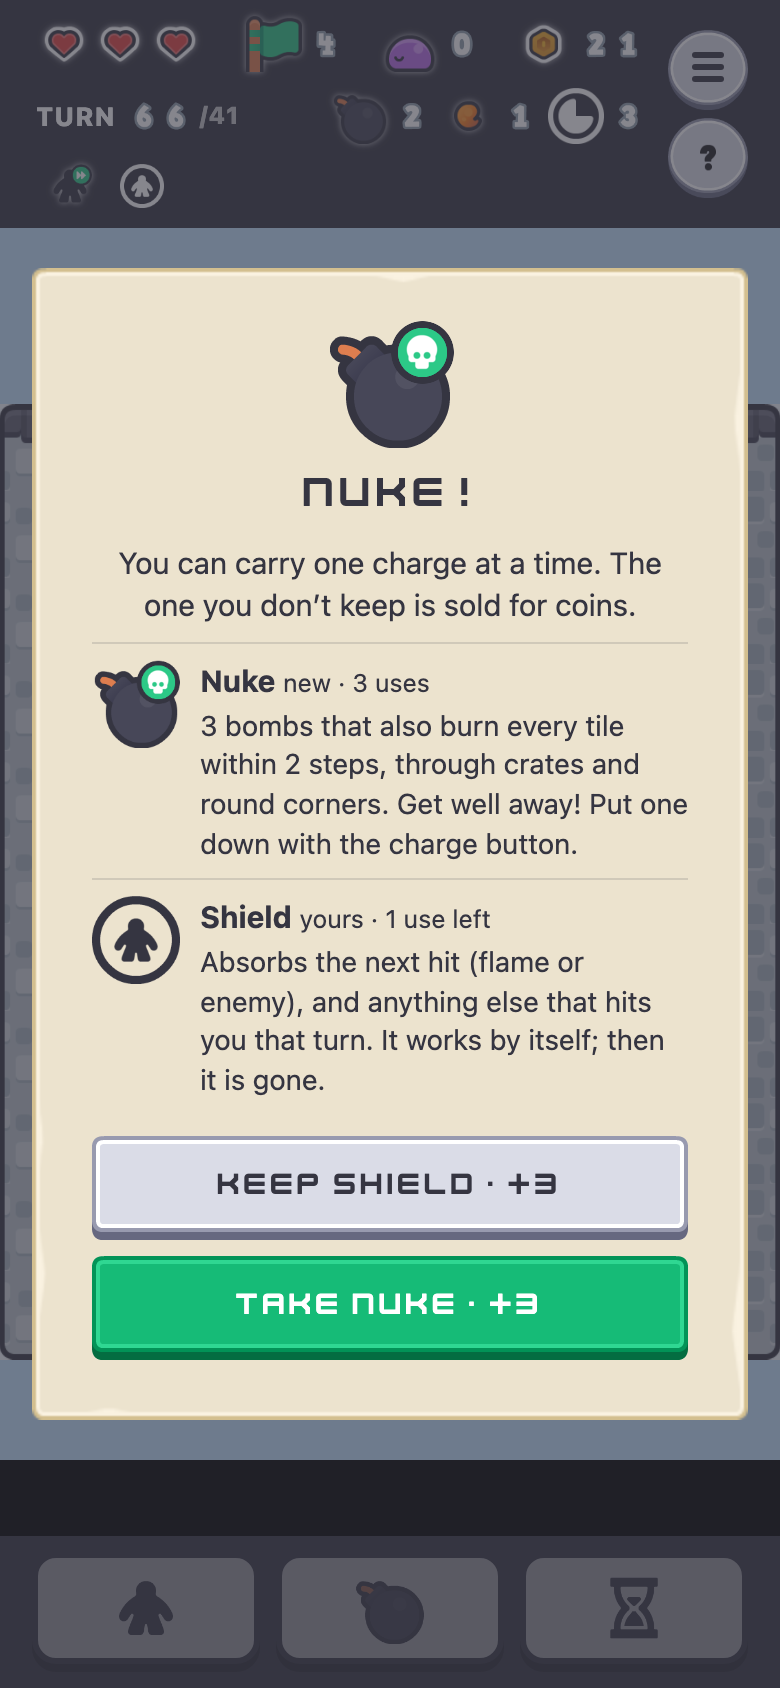
Pierce, the player picks up a Nuke; the choice opens over the scene and the finger taps Take
Nuke), and the exit (walking out once it opens; blasting it lets enemies out). Heart and
Coin bag only change numbers, so they have no scene; nor does the shop. Every other scene shows
a way to die: walking into a blast, not getting far enough, blocking yourself in with your
own bomb, one bomb setting off another, touching an enemy, and a couple of funny ones (the
Detonator next to you, a Run into an enemy). The scenes play in a fixed order and loop —
the controls first, then the rest, with a way to die after every four — each made new every
time. The panel shows which one it is (12 / 56), with a bar under it that fills as the scene plays and a yellow mark where its moment comes (the same bar sits under every clip in a dialog); ◀ ▶ (or the ← → keys) go to the
one before or after, and ↺ back to the first; the dice button plays them in a random order instead (lit while on; kept for next time). The demo carries on where it was the next time
it plays, after a reload too. It is
view-only; click or tap anywhere else to play (a key does nothing: Ctrl or Shift used to start the game), and that tap does nothing
else. The menu's Demo plays it again; a tap brings you back to your run as it was.
A test URL (?seed and the like) skips it; ?demo shows it anyway, from the first scene.
With a controller the demo shows a virtual controller under the caption (a line drawing of the pad, d-pad, four
face buttons, shoulders, stick and Start, with the pictures of the pad in use) that lights the
button for each press (lit for 0.7 s, PAD_LIT_SECONDS in ui/padOverlay.ts; a d-pad press lets go, then the cursor hops), and a dashed cursor on the board that hops between the blue tiles, in
place of the finger. It has its own scene list: the cursor (the d-pad), Move, Bomb, Wait, L1
(back to you), R1 ("What is that?": the aim jumps to an enemy, Move explains it), the stick
(the view zooms in to twice the size and the stick slides it left, right, up and down, then pressing it brings it back to you), look (the
stick pushed toward an enemy to look at it) and Start (the real
menu opens over the scene, with your run's state in it, and closes again), then the same gameplay
scenes as the touch demo. A thin progress bar of the scene's turns runs along the bottom edge of the TV (inside the glass, above the caption), in every demo. The idle white pictures (d-pad, stick) are white; the face buttons are grey at rest and take their colour while pressed; the pictures lie under the drawing, so its lines stay on top. The touch-only scenes (the long-press bomb, auto-move, the top bar tour,
"What is that?" by tap) and the charge swap (a dialog's choice) are left out. The pad's demo keeps
its own saved place, apart from the touch demo's. When the input changes (a pad press, or a mouse,
touch or key) the demo switches at the next scene, never in the middle of one: to the pad's list
from its first scene, or back to the touch list where it was left. Start or LB ends the demo as ever, but a face button must be held to play: hold the confirm
button (Cross, or A on an Xbox pad: the bottom button; on a Nintendo pad A is the right-hand button) until the ring round it on the virtual controller fills: play starts then, and the button, still held, does nothing in the game until you let go of it. The
last line reads "Hold (the button's picture, A on a Nintendo pad) to play" instead of "Tap anywhere to play"; a short press of any face button does nothing.
The input button under the scene buttons names what the demo is shown for and cycles on each click: Input: touch (the finger),
Input: mouse (the same scenes with a pointer instead of the finger; its last line reads "Click anywhere to play"),
Input: keyboard (see below), then
Input: controller: ps5, xbox, switch and generic (the pad's scenes and virtual controller with that
kind's button pictures, and "Hold (the button) to play"). It overrides what was detected, for this demo only (nothing is
kept): it stays until the demo ends or a controller is plugged in or unplugged (no click, tap or button press drops it; only holding the confirm button, which ends the demo, leaves it). The scene starts again for the new input. The dialogs' clips follow the real input, not the pick.
The demo's own controls on a controller (shown as the button's picture on each control while the demo is drawn for a controller): d-pad left / right = the scene before / after, up = shuffle on / off, down = back to the first scene, R1 (RB, R) or View = the next input in the list above. Hold the confirm button to play.
With the keyboard (pick Input: keyboard; the entry cycles after mouse) the demo shows a key overlay under the caption instead of the
finger: Kenney's key pictures for the arrows, Alt, Shift, M B V, Space, ?, Home, Enter and Esc, white at rest and
lit for 0.7 s when pressed. Each turn is played with the fewest keys the game accepts: a plain arrow for a step, B (or M, V) then an arrow
for a bomb next to you, Space to wait, and for a far tile Shift + arrows (the first only wakes the dashed cursor on you, as in play) and then the action
key. Its scenes: Move, Bomb, Wait, the Shift cursor, ? (then an arrow to the enemy, Enter explains), Alt + arrows (the view zooms to twice the size and slides, Home brings it back) and
Esc (the real menu opens), then the touch demo's gameplay scenes without the touch-only ones and the charge swap, with captions worded for keys. The last line reads
"Press Enter or Esc to play" (those two end the demo; ← and → change scenes, Tab, Enter and Space work the demo's own buttons, and every other key does nothing). Its place is saved apart from the other lists, and the dialogs' clips follow the real input.
The Almanac's Tests tab (in a Developer run) has a Demo controller sample that presses each
part in turn, on an Xbox, PlayStation and Switch pad.
You are the green astronaut (animated: it bobs while waiting, hops from tile to tile, crouches to place a bomb, and walks into the doorway and jumps when a level is cleared; enemies hop between tiles too, and flip over when they die). Everything else on the board moves too: bombs pop in, swell as they count down, slide when kicked and fly when thrown; crates burst; flame fades out; drops and the gem rise away when taken. A number in the top bar bumps when it changes, and dialogs pop up and shrink away. Goal of each level: destroy every enemy, uncover the exit door hidden under one of the crates, and step onto it.
Each turn you pick one action; then the world takes its turn, in this order: enemies step where their arrows pointed, bombs count down and explode, and enemies show their next step.
The action buttons are icons only (a game-piece figure = Move, a bomb = Bomb, an hourglass = Wait). Picking one turns it green and highlights the tiles it can use. There is no explanation text during play (user request): what each power-up and charge does is shown when you first get it, and ? then any button explains that button. Upgrades don't add buttons: they make Move and Bomb do more.
| Action | Phone | Keyboard | What it does |
|---|---|---|---|
| Move | Tap a tile next to you, or tap Move and then any highlighted tile | M, then a direction — or W A S D / arrow keys straight away (Q E Z C diagonally, with Diagonal) | Step one tile up, down, left or right onto an empty tile. With the Run power-up: or 2 tiles in a straight line. With Teleport: or any empty tile up to 3 steps away (4 with Run too), over anything. With Kick: walking into a bomb kicks it. With Diagonal: or a diagonal step. With Slide: or slide in a straight line until a wall, crate or bomb stops you. |
| Bomb | Tap Bomb, then a highlighted tile — or press and hold a tile next to you | B, then a direction | Place a bomb on an empty tile next to you. You can have 1 bomb on the board at a time. With Throw: or 2 tiles away in a straight line, over a crate, bomb or enemy (not a pillar). With RPG: or fired in a straight line, as far as it flies. Always a plain bomb: Pierce, Power, Nuke and ICBM are used with the charge button (see Charges). |
| Wait | Tap Wait | Space | Do nothing; the world takes its turn. (Tapping yourself did the same until 2026-10-26; now it does nothing, since a stray tap could kill you.) |
Deadly moves are marked, and the shortcuts refuse them (since 2026-10-26). The game plays each choice out on a copy of the board, with the real rules, to see whether it would cost you a life this turn (a Shield or Flame Pass that would take the hit, or an Immortal run, means it wouldn't):
- Wait turns red when waiting would kill you. It still works when pressed: sometimes there is nothing better.
- With a button picked, a tile that would kill you is red with a cross instead of blue. You can still tap it, on purpose.
- The shortcuts never take a deadly move: a tap on a tile with nothing picked, W A S D / the arrow keys / Q E Z C with nothing picked, a long press for a bomb, and auto-move (Go, or a tap on the destination). The tile flashes red (and the phone buzzes) instead. To make such a move anyway, pick its button first (Move, then the tile).
It only looks one turn ahead: walking into a dead end that a blast will fill next turn isn't marked; the danger overlay shows that.
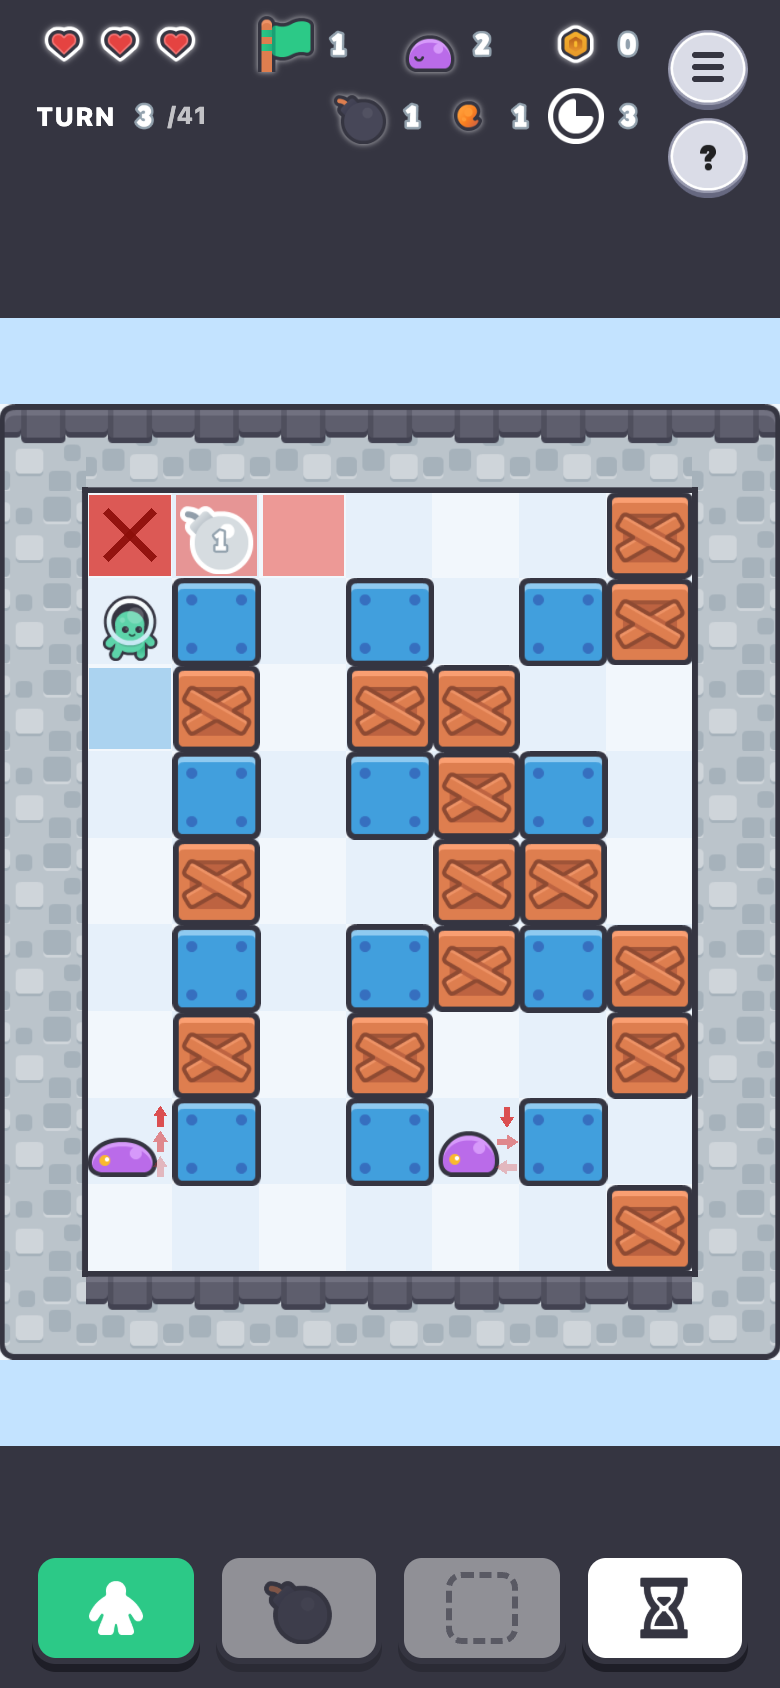
When Move or Bomb can do several things, the tile you tap decides: next to you is a step (or a kick, into a bomb), 2 straight is a run, further is where a slide stops. Without picking anything, a tap on the tile where a slide stops slides there; next to you is a bomb, 2 away a throw, further an ICBM while you have launches, otherwise an RPG bomb. With Diagonal, a diagonal neighbour is a step too — tap it, picked or not. (Teleport is a charge, used only from the charge button.)
Auto-move: tap any tile further away that you can walk to — empty floor, the exit, the gem or a drop. You take the first step at once, just as a tap next to you would (if that step is safe). Every tile you will land on along the way, including where you're going, is highlighted blue — with Run that's only the tiles you land on, not the ones you skip; with Diagonal the way cuts corners with diagonal steps — with a line of arrows through them from you to there, one arrow on each pointing the way that move goes (the first in red when it isn't safe), and the Move button becomes Go (same walk icon, with a green border): each press of Go — or each tap on the destination itself — takes one step along the way (one turn, as always — the world still moves between steps). The way is worked out again every turn. Tapping another far tile sets a new way. Auto-move ends when you arrive, when you move somewhere off the blue way (you changed your mind), when the destination can no longer be reached, when you tap a wall or crate, or on Esc (touch: the round Cancel button above the action bar's top right, shown while a destination or a picked action is set). The way never crosses the open exit (that would end the level on the way); it only steps onto the exit when the exit is where you are going. If the only way somewhere is over the open exit, auto-move can't go there. It won't take a deadly step: onto an enemy, onto a tile an enemy's arrow points at, into flame this turn, or any other move that would cost a life this turn. The next step then shows red, and Go / the destination wait for you to deal with it (Go falls back to picking Move, so you can step aside yourself). With a controller or the keyboard cursor, every tile auto-move can take you to (the same ones a tap would walk to, with a safe first step, not already bright blue) shows as a faded blue, next to the bright blue of the single actions. The cursor hops onto them like any other tile, and Move/Go there (M or Enter on the keyboard) is the same as tapping that tile: the label says "Walk here · N steps" and the first step is taken. With a way already set, the cursor can still hop to every faded tile (Move there sets a new way); on the destination itself the label says "Keep walking · N steps". The way is previewed before you confirm: with the cursor on a faded tile, or the mouse (not touch) hovering over one with nothing picked, the board shows the route exactly as auto-move would draw it (landing tiles, arrows, the first one red when unsafe) without setting it or taking a step. Tapping, clicking and touch are unchanged. Once every enemy is gone, the way needs no more presses: you walk there by yourself, two steps a second (still one turn per step).
Autopilot (Settings in the menu, "Autopilot", on by default): the moment the last enemy is
gone, a note at the top says Autopilot: cleaning up, and after a one-second beat the character
walks round by itself, two and a half moves a second, to every coin, charge and gem still lying on the floor,
then onto the exit. Every move is an ordinary turn (a Run if you own it), so gathering costs
turns and can lose the par bonus. The route is the one that takes the fewest turns in all (the
exit last; a coin on the way is picked up free). A gem, or a charge that needs a choice (one is
already carried), opens its dialog on that turn and the walk waits for your answer, then goes
on. If a gem lies under a crate that is still crumbling, the note says Autopilot: waiting for the
crates and it waits; when only the exit is left it says Autopilot: off to the exit. The usual
auto-move safety applies (never a deadly or unsafe step); if it can only wait for many turns, or
no safe turn exists, it stops with the toast "Autopilot stopped · Your turn". If a coin, charge or gem
lies behind a bomb that is still ticking (or flame still burning), it waits for that too (Autopilot: waiting for the bombs) and then fetches it. No way at all to the
exit is the existing boxed-in rule (a life).
Stopping it (for that level): Esc on the keyboard, L1 on a controller (its picture is on the note),
or the small Stop button on the note (touch and mouse). Turning "Autopilot" off in the menu stops it at once.
While it walks the board takes no input: taps, clicks, long-press bombs, the action bar (dimmed),
the keys (WASD, arrows, Q/E/Z/C, action keys, Space, Enter, ?, Shift + arrows) and the controller's
cursor and face buttons are ignored, and the controller's cursor is hidden. Still working: its
dialogs, the menu and Start (opening one pauses the walk), the fullscreen button, the top bar's
info taps, and looking around (Alt + arrows, Home, the right stick, dragging the board).
How far one move of auto-move goes (and the first one, when you tap a far tile): a tile next to you is always a step. Otherwise it's a Run (2 tiles straight along the way) when you have Run and the way goes straight, or a step — then it works it out again next turn. It only lands on safe tiles. Auto-move never spends a charge: a Teleport is yours to use, from the charge button.
Tapping an enemy, a bomb, burning flame or a wall does nothing (apart from ending auto-move; with Kick, tapping a bomb next to you kicks it, with Bomb Pass it walks onto it, and with both — or with the Detonator too — a dialog asks which, as it does for an arrow key into such a bomb). Tapping a crate walks you to the tile beside it. A tap never walks into an enemy.
What is that? Tap the round ? button at the top right, below the menu on a phone and beside it on a wider screen (or press ?), then tap anything on the board — or any action button — to see what it is and what it does: an enemy (with its next moves spelled out), a bomb, burning flame, a wall or crate, the exit, the gem, a drop. The ? turns green while it is on; it works for one tap, and tapping it again or Esc turns it off. For things you can walk to, the dialog has a Walk there button that starts auto-move there. The items in the top bar (lives, level, enemies left, coins, turn / par, bombs, blast, fuse, passes, Star) explain themselves with a plain tap. Most of these dialogs play a short clip of what they describe, made on the spot like the demo's scenes and new every loop: a bomb counting down and going off, lingering flame, a crate breaking, flame stopping at a pillar, the last enemy dying and the exit opening, losing a life, the exit, the gem, coins, each power-up and charge; for the actions (Move, Bomb, Wait) and the power-ups you work yourself (Run, Kick, Throw, Diagonal, the Detonator), a finger shows how. Enemies have only their picture. With reduced motion turned on, each clip is a still picture of its moment instead.
Fullscreen button: a round button in the top bar, between "?" and the menu, shown only where the browser has fullscreen; it shows "enter" or "leave" by the state (it follows F11 and Esc too). On a phone's portrait bar, where three round buttons would make the bar taller, all three are a little smaller. With a controller, the menu's Fullscreen switch does the same, but a controller press is no browser gesture, so a plain browser may refuse: a note says Press F11, or use the fullscreen button (the planned desktop wrapper, Q41, will make it work).
Menu: the round button at the top right (or Esc with nothing picked). It shows the level
and seed, the Sound and Vibration switches (see Sound and vibration below), Fullscreen (on or off now; where the browser has fullscreen) (the game never goes fullscreen by itself; F11 or Esc leaves it; iPhone Safari has no fullscreen for pages) and Autopilot, and its
buttons, kept compact: Resume and New side by side (New starts a new run and asks first,
since the current run can't be got back), then two rows of small ones — Almanac (every
power-up, charge and enemy type, and everything on the board (crates, pillars, bushes, metal
crates, oil, spikes, oil barrels, rubble, with the level each first turns up on), with its picture
and what it does, in four tabs, and in a Developer run a fifth, Tests: fixed edge-case situations such as a slide over two gems, each with what to expect; the same scenes join the landing demo with ?dev; an entry with a green ▶ opens its clip; Demo controller is a sample of the demo's virtual controller, each tap pressing its next part on an Xbox, PlayStation and Switch pad in turn), Scores (the high scores), Changes (the list of changes in every release), Demo (the demo again) and Bug (an
email to the game's bug-report address, which needs no account, filled in with the
game's version, your device and the run, so it can be replayed; a long run's record goes on your
clipboard to paste in).
Press and hold a tile next to you (about half a second, with a short buzz on phones that support it) to arm a bomb there: its blast shows, and letting go places it. Sliding off the tile first cancels it.
Charges are things enemies sometimes drop. You carry one at a time, and use it when you choose, with the charge button beside Bomb (or V). It shows the charge's icon and how many uses are left, or an empty dashed slot when you carry none (greyed out then); "What is that?" on it explains charges and the choice below. Every charge is used with it except the Shield and Flame Pass, which work by themselves while carried and are used up by the hits they take, leaving the slot empty (user request, 2026-10-25; for a few hours that day they had to be raised with the button first) (since 2026-10-24: until then every charge worked the moment it was picked up, and they piled up). The top bar shows it too.
- Picking up the same kind adds to it (3 more Pierce bombs).
- Picking up another kind asks: keep yours and sell the new one, or take the new one and sell yours (for what is left of it). A charge sells for half its shop price, rounded up. A Freeze held can also be used first, then the new charge taken (a third button; charges that need aiming can't be). The choice takes no turn.
- The same goes for a charge chosen from a gem or bought in the shop: with another kind held, it asks (since 2026-10-25, user report: it used to replace the one held without asking).
- What you carry goes on to the next level and through a death. The first time in a run you pick up each kind, a dialog says what it does.
(Diagonal was a charge until 2026-10-23; it is a power-up now.)
| Charge | Icon | What it does |
|---|---|---|
| Pierce | the Crate Pass icon (crate with ✕) | 3 bombs whose flame goes through crates, burning every one in reach. The charge button puts one down. |
| Power | the Fire +1 icon | 3 bombs whose flame reaches all the way to the walls (crates still stop it). |
| Nuke | bomb with a skull badge | 3 bombs that also burn every tile within 2 steps (across plus down), through crates and round corners; walls still stand. It can catch you too: get 3 steps away. |
| Shield | the Move figure in a ring | Works by itself while you carry it, level after level: a ring round you until something hits you. It absorbs that hit (flame, enemy or spikes); under a falling ceiling it pushes you out to an empty tile next to you, if there is one, and anything else that hits you that turn. Then it is used up and the charge slot is empty. |
| Freeze | a padlock | Press the charge button, then tap yourself — or press it again: every enemy freezes in place for 3 turns, that one included: they turn blue inside a block of ice and thaw a step each turn, then carry on with the moves their (faded, icy) arrows show. |
| Decoy | three pawns | Press the charge button, then tap where it goes — up to 3 tiles away in a straight line, with nothing in the way (a wall, crate, bomb, enemy or flame stops it, as it stops a slide): a pale copy of you. Enemies that chase you (Seekers, Ghosts, Hunters, Sprinters) go after it instead, until the level ends — or until an enemy reaches it or flame burns it, which destroys it. It doesn't block anyone. |
| ICBM | bomb with a target badge | 3 launches: the charge button fires a bomb as an RPG's (or I, then a direction) and it goes off the moment it lands, at any distance. Your bomb limit doesn't count. |
| Flame Pass | flame with a shield badge | Works by itself while you carry it: flame can't hurt you for the next 3 fire hits (an orange ring round you; the charge button and the top bar count them), level after level; when they are used the charge slot is empty. Enemies still can. A power-up that worked for good until 2026-10-25, when the balance lab found it won the game alone. |
| Teleport | the Move figure with an outbox badge | 3 jumps: press the charge button (or P), then tap any empty tile within 3 steps (counting across and down), over anything (with the keyboard: P, then Shift + arrows to the tile and Enter, or a plain arrow for the nearest one that way). With Run, 4 steps; with Diagonal, a square (a diagonal step counts as one). A power-up until 2026-10-25, for the same reason. |
| Acid | bomb with a flask badge | 1 bomb that burns like a Nuke — every tile within 2 steps (across plus down), through crates and round corners — and cracks every pillar in that area, diagonal ones included (cracks show on it; since 2026-10-26: until then it burned a plain cross and cracked only a pillar an arm of it ran into). It can catch you too: get 3 steps away. Any later blast that reaches a cracked pillar breaks it: its tile becomes floor, dust trickles from the ceiling over the 8 tiles round it, and 4 turns later it falls as rubble, for good — nothing gets through rubble, not even flame. Whatever is under it is crushed: enemies (a trap to set), drops, bombs, and you — unless you carry a Shield, which pushes you out to an empty tile next to you (with none, nothing saves you; a Star doesn't). If the rubble cuts you off from the exit or from an enemy, the level can't be won: that costs a life at once (trapped). The outer wall never breaks. Since 2026-10-25. |
A Pierce, Power, Nuke or Acid bomb wears its charge's icon as a small badge. Bomb always puts down a plain bomb.
With an action picked, holding or hovering a highlighted tile previews what it will do: where you will end up, a faded bomb with its blast, a kicked bomb's stopping place, a changed number.
- Picking an action highlights the tiles you can choose, in blue. Tapping the action again, pressing Esc, or tapping anywhere else cancels it.
- Preview before you commit: on a phone, press and hold a highlighted tile to see the result (for a bomb, its blast in orange); slide to another tile to change your mind; let go to commit. With a mouse, hovering shows the same preview. For a kick, the preview shows where the bomb will stop.
Bombs
- The number on a bomb is how many more of your actions until it explodes. A new bomb shows 3. A bomb showing 1 (flashing white) explodes at the end of your next action.
- The blast is a cross reaching 1 tile in each direction. It stops at walls; it destroys the first soft block (wooden crate) in each direction and stops there.
- A bomb caught in a blast explodes at once, whatever its number (a chain reaction).
- Flame lingers for one more turn. After a blast, its tiles keep burning (orange, with flickering fireballs) through the next turn: any enemy that walks in dies, and so do you if you wait in it. You can't step or put a bomb into burning tiles — unless flame can't hurt you (a Flame Pass carried, a Star), then you can walk through it like floor (with Flame Pass, using one of its hits). It goes out after that turn.
- Bombs block movement, for you and for enemies.
- Bombs go on a tile next to you, not under you as in the original. Both were measured with the balance lab; see Measured: bombs under the player below for how the original rule would change the game.
- Bombs can't be placed on an enemy.
- Pierce, Power, Nuke and Acid bombs are put down with the charge button (see Charges above); such a bomb wears its charge's icon as a badge.
Danger
- Strong red tiles will burn at the end of this turn if you wait (including flame still burning from last turn).
- Light red tiles will burn at the end of the next turn (including flame that will still be burning then).
- A red outline marks every tile a bomb on the board will hit on a later turn, however long its fuse (with the chains and spreading fire it will set off, if you wait), and where a ceiling will fall: it fills in light red, then strong red, as the moment comes (since 2026-10-25; until then a bomb's tiles showed only in its last two turns).
- Fire that spreads over oil or through bushes, raised spikes, and a ceiling about to fall show the same way (see The board).
Enemies
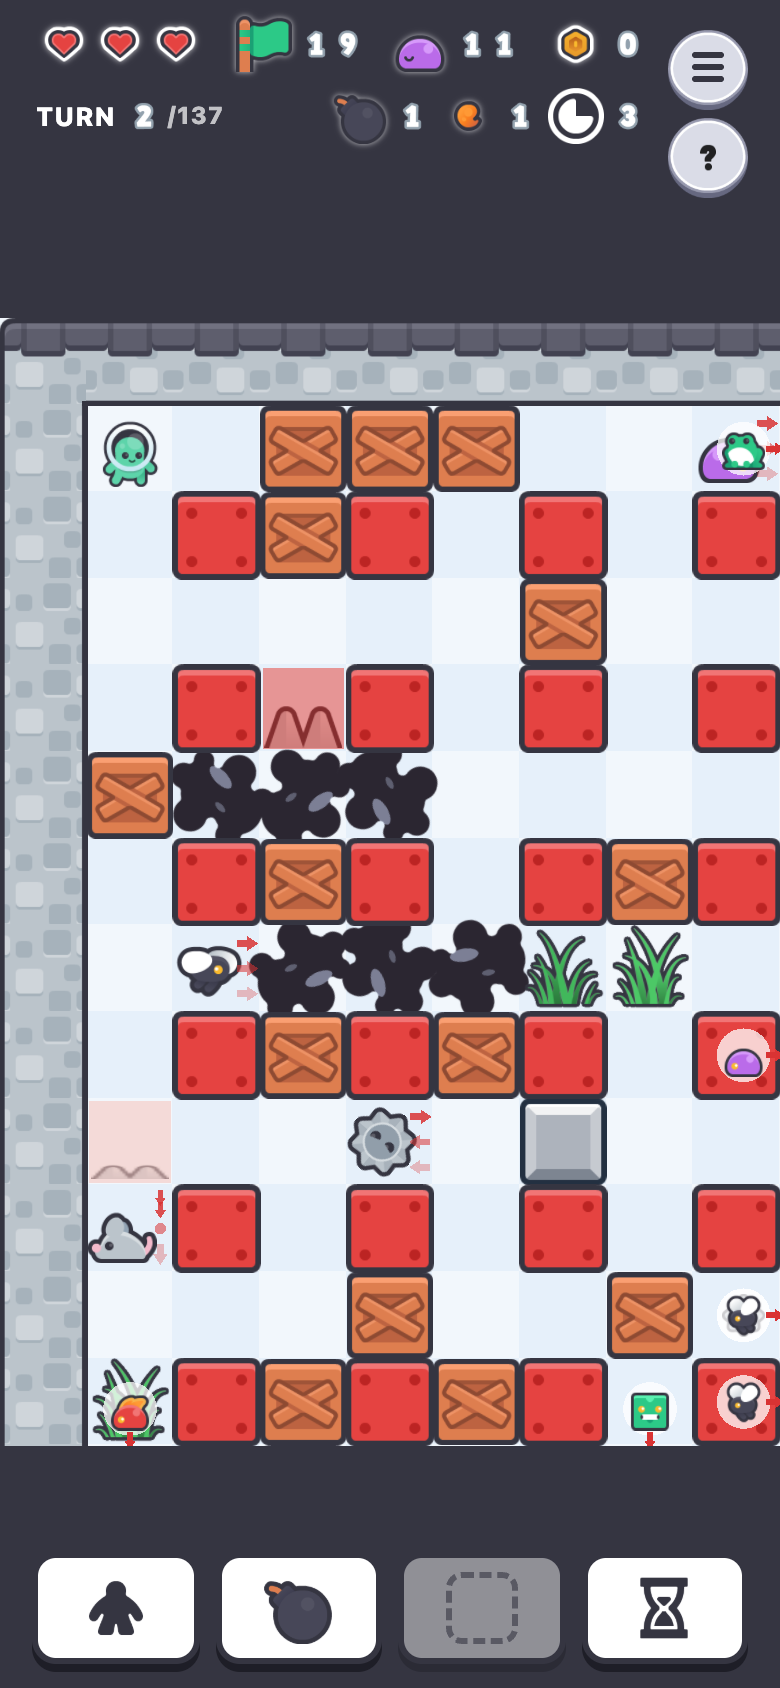
Every enemy shows its next 3 moves as a column of see-through red arrows on the right side of its tile: the top arrow is its next move (strongest), the ones below are the 2nd and 3rd moves (fainter). It makes exactly those moves, one per turn, so you can time a bomb for where it will be. No arrows (and closed eyes): it has nowhere to go and stays put. A dot among the arrows is a rest: Ghosts and Sprinters move only every other turn, with their eyes closed while they rest. Two arrows one behind the other are a Sprinter's dash: 2 tiles in one turn (a dash through your tile catches you there). If you put a bomb on a tile it planned to walk to, it stops there and plans a new route. Enemies keep clear of each other: each plans its moves around where the others will be, so a group (like the 3 let out of a blasted exit) splits up instead of moving as one; they only share a tile when there's nowhere else to go. Touching an enemy costs a life — walking into it, it walking into you, or the two of you swapping places. Flame kills enemies.
| Enemy | Looks like | Appears from | Moves |
|---|---|---|---|
| Blob | purple slime | level 1 | Wanders; usually keeps going the way it was heading. |
| Seeker | fly | level 4 | Half the time takes the shortest way toward you; otherwise wanders like a Blob. |
| Drifter | spinning saw | level 7 | Goes straight until blocked (or another enemy is heading there), then turns. |
| Sprinter | mouse | level 10 | Rests every other turn, then dashes 2 tiles at once, half the time toward you. |
| Ghost | green block slime | level 13 | Moves every other turn, always the shortest way toward you, through crates. |
| Wisp | fire slime | level 16 | Wanders like a Blob, through crates. |
| Hunter | frog | level 19 | Always takes the shortest way toward you. |
Ghosts and Wisps can be inside a crate (drawn see-through there); flame that burns that crate kills them, but flame stopped by a crate in front of them doesn't reach them. Bombs stop every enemy. Each level mixes the types met so far.
How many enemies a level has follows its crowding: each type counts for how dangerous it is (a Blob 1, up to a Hunter 2), and they are added until that reaches 1 per 26 open tiles on level 1, rising to 1 per 9 by level 20 — so a bigger board brings more enemies, and later levels are more crowded. Level 1 has 2; level 20 about ten, on a bigger board. Enemies never start within 4 tiles of you.
Drops and coins
A slain enemy often leaves coins (bronze = 1, silver = 2, gold = 5: about 1 coin a kill on average) or sometimes a charge (see Charges) on its tile. No enemy drops a Decoy, Freeze or Shield while one already lies on the board. Pierce, Power, Nuke and ICBM add up, so they always can. Drops never share a tile, and never land on the uncovered exit: the new one rolls to the nearest free floor tile (up to 2 steps away). Walk onto them to collect them. A later flame burns drops lying in the open, so pick them up soon. Coins are spent in the shop (below).
The exit
- The exit door (a short arched doorway: orange while locked, dark once open) is hidden under one of the crates. Burning that crate reveals it.
- The door stays locked while any enemy is alive (top-bar enemy count). When the last one dies, it opens; step onto it to finish the level.
- Don't blast the uncovered door: flame on it lets out 3 more enemies (of the level's toughest type). Those drop nothing. They can't be hurt by the flame that let them out (it lingers a turn), but a new explosion kills them as usual.
- Clearing a level pays 2 coins. Par: the top bar shows the turn you are on (from 1)
/ par. Finish within par for 5 more. Par is 10 turns, plus 0.3 a tile of the board (floor and crates), plus 8 per enemy: 41 on level 1.
Power-ups
Every level hides one gem under a crate (never the exit's). Burn the crate to reveal it — it is in a random colour (the colour means nothing) — then walk onto it. Don't blast it once it's uncovered: flame on it destroys it and lets out 3 enemies, just like the exit (and, as there, those enemies can't be hurt by the flame that let them out).
Taking the gem offers 5 different power-ups, and you choose one. The dialog shows each with what it does; it can't be closed without choosing, and choosing takes no turn. Choosing takes two taps: tap a card to select it (it turns green, and a clip above the cards shows it in action), then Choose to take it. A card for something with a number shows what it changes from where you are: Blast 2 → 3 for Fire +1, Bombs, Fuse, Lives, Coins, a Star's turns, or a charge's uses when you carry the same kind (the shop's cards too). The first card is selected to begin with. Heart and Coin bag, which have nothing to show on the board, show their picture there instead. The 5 are drawn at random, but not all are equally likely: common ones (Bomb +1, Fire +1) come up far more often than rare ones (Proximity alert, Heart). An ability or pass you already hold is never offered. The offer is fixed by the seed and level, so a retry after a death offers the same. If you die on the turn you take the gem, there is no choice, and the retry has the gem back. If the same step also reaches the exit, you choose before moving on.
| Power-up | Looks like | Effect |
|---|---|---|
| Bomb +1 | bomb with a + badge | One more bomb on the board at a time, up to 5. |
| Fire +1 | bomb with an expanding-arrows badge | Blast reaches one tile further, up to 5. |
| TNT | fireball with an expanding-arrows badge | Blast reaches two tiles further: two Fire +1s in one, up to 5. |
| Fuse +1 | bomb with a timer badge | Your bombs start one higher (more time to get away), up to 5. |
Each stat has a limit of 5, so blasts can't span the board. A power-up with no room left for all it gives isn't offered (no Fire +1 at a blast of 5, no TNT at 4), and its card says how far you'd go: Blast 2 → 4 (max 5). | Run | the Move figure with a fast-forward badge | Move can run: 2 tiles in a straight line in one turn (or R, then a direction). Both tiles must be empty; an enemy on the tile in between is run into. Anything on that tile is picked up. | | Kick | bomb with a right-arrow badge | Walk into a bomb next to you and it slides away until the next tile is blocked (a wall, crate, bomb or enemy), keeping its number. | | Throw | bomb with an up-right-arrow badge | Bomb can also go exactly 2 tiles away in a straight line, over a crate, bomb or enemy in between — but not over a pillar or the outer wall (or T, then a direction). | | Diagonal | the Move figure with a diagonal-arrows badge | Move can also step diagonally, where one of the two tiles beside the step is open — not between two blocked tiles (no squeezing since 2026-10-25; the lab found the squeeze was most of its strength) (or Q E Z C: up-left, up-right, down-left, down-right); auto-move cuts corners with it. With the Teleport charge, it widens Teleport's reach to a square. A charge until 2026-10-23. | | Slide | the Move figure with a two-way-arrow badge | Move can also slide in a straight line until the next tile is a wall, crate or bomb — tap the tile where it stops (or L, then a direction) — picking up whatever it passes. It can't stop early: an enemy on the way is crashed into (a life lost), and flame on the way burns (unless Flame Pass or a Star). The open exit stops it. | | RPG | bomb with a forward-arrow badge | Bomb can also fire a bomb in a straight line (or F, then a direction): it flies until the next tile is a wall, crate, bomb or enemy and lands just before it, then counts down as usual. | | Detonator | bomb with a ! badge | Your bombs pulse with a red glow: tap one and it goes off this turn (or X, then tap it; with the keyboard, Shift + arrows to the bomb and X or Enter). No button. | | Proximity alert | bomb with a warning-sign badge | Your bombs go off the turn an enemy is right next to one — one that walks up, or one already there when you place it — wherever you are standing. (Until 2026-10-25, anywhere in its reach.) The danger overlay shows it ahead, from the enemies' arrows. | | Crate Pass | crate with an ✕ badge | Walk through crates. | | Bomb Pass | bomb with a shield badge | Walk over bombs. | | Star | star | Nothing hurts you for 8 turns (a gold ring; the top bar counts down); you can walk through flame meanwhile. | | Heart | heart | One more life. | | Coin bag | coin | 10 coins. |
Run, Kick, Throw, Diagonal, Slide and RPG add no buttons — they make Move and Bomb do more (? then the button says how). The Detonator adds none either: your bombs pulse, and a tap on one sets it off. The top bar shows a small icon for each ability and pass you hold.
The shop
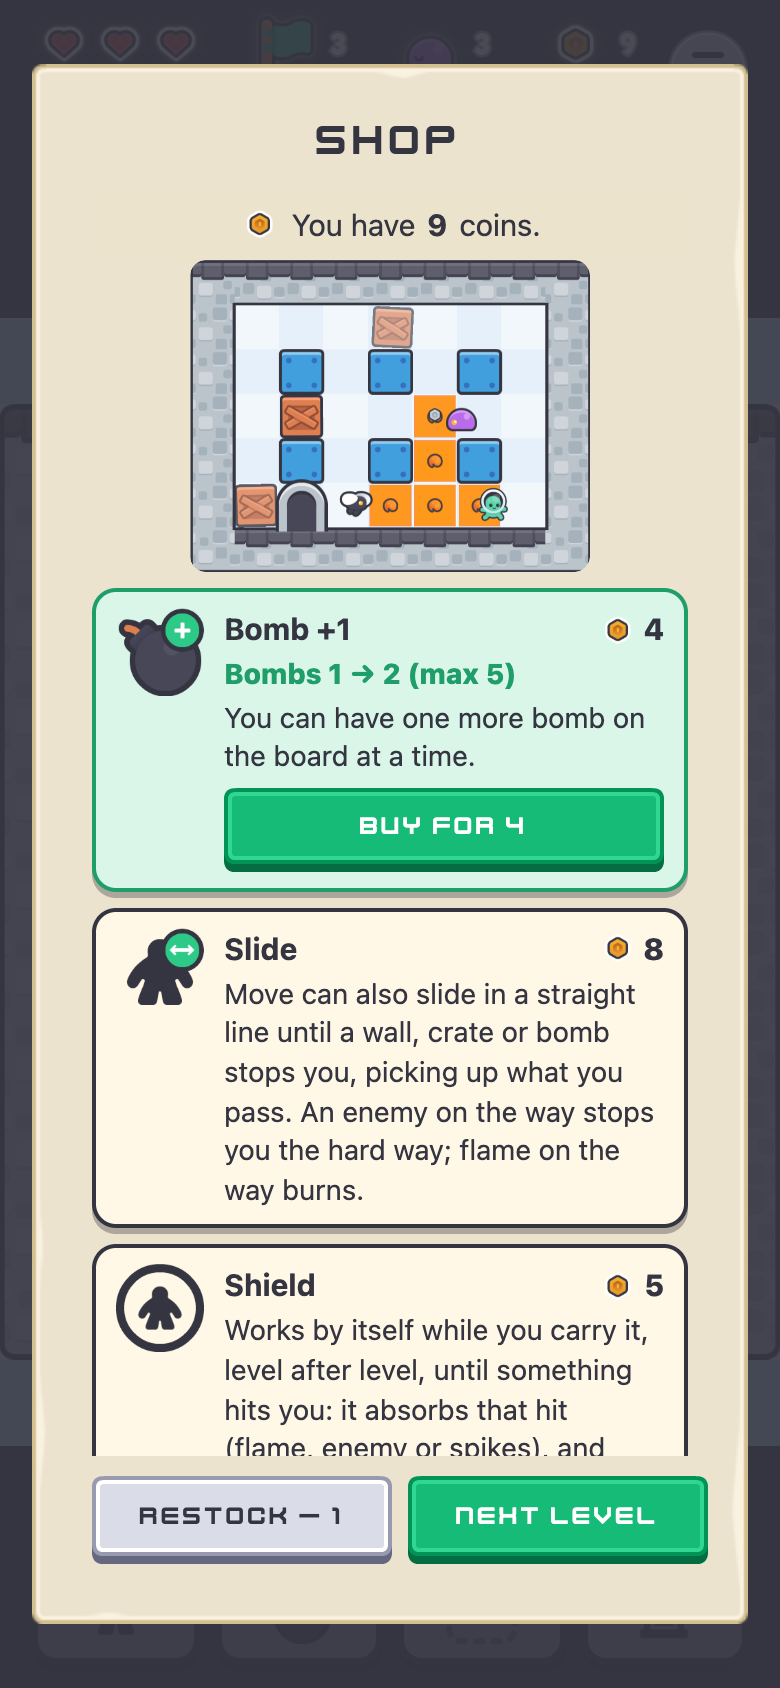
After every 3rd level (3, 6, 9, 12, 15 and 18), going on from the level-cleared banner opens the shop before the next level. It has 4 items: power-ups (none you already hold, and no Coin bag) and charges, drawn with the gem's rarity weights, each with its price — common ones cheap (Bomb +1 and Fire +1 cost 4, most abilities and passes 6), rare ones dear (Proximity alert 10, Heart 12), charges 3–7. Three levels earn about 12 coins, or about 27 when each is cleared within par, so the first shop buys two cheap things, or three or four. Tap an item to select it (a clip above shows it in action), then its Buy button (or, when it's too dear, how many coins you still need); what you buy works at once and lasts for the rest of the run. Restock draws 4 new items for 1 coin, then 2, 3… in the same shop. Next level leaves. Shopping takes no turns. What a shop offers comes from the seed, so the same dungeon offers the same things. Nothing carries over between runs: leftover coins only count on the high-score board.
Lives
You have 3 lives. Caught in a blast or touched by an enemy (or on raised spikes, under a falling ceiling, walled in by rubble, or boxed in — nowhere to step and nowhere to put a bomb, with nothing left on the board that could change that, as after a Teleport into a gap between two crates), you lose one and the level starts again with the same layout and enemies. You keep everything else: coins, stats, every power-up (abilities and passes included). The charge you carry drops where you fell (since 2026-10-25), with what was left of it: walk back over it on the retry to pick it up again, before a blast burns it. (The original took the passes and the Detonator away; since 2026-10-23 a death otherwise costs only the life.) The banner says how and where you died — "Level 3, turn 12: you walked into a Blob." — and so does the game-over banner. Both replay your own last turns before the death, over and over, on the part of the level where it happened, so you can see what went wrong. With none left, the run is over and the seed is shown, so the same board can be replayed.
New run: modes
Menu → New (or the button after the victory) starts a new run, with two optional modes (there is one board size, and crates always crumble once the enemies are gone):
| Mode | What it does |
|---|---|
| Developer (checkbox) | An extra, rainbow gem lies right next to you at the start of every level (and after a death), turning and glittering so it can't be mistaken for the level's own. It offers every power-up you don't have yet, and every charge (not the usual 5 power-ups), to try any of them at once. The level's own gem is still hidden under a crate as usual. Achievements still count, but are marked with a red border (the victory banner is framed in red), like the red quarters some bars kept for their own jukebox plays. |
| Immortal (checkbox) | Nothing can kill you, so you can play through to the end — but an Immortal run earns no achievements. |
Seed: the New run dialog also has an optional seed field. Empty means a new, random dungeon; type a seed (shown in the menu and at the end of a run) to play that dungeon — to share one with a friend or try it again. Any other text, a word say, is made into a seed too.
High scores: every finished run — game over or the win — goes on a board kept in this browser (Menu → Scores, or the button on the end-of-run banner, which also says when a run makes it). Runs are ranked by how far they got (a win first, then the level), then coins, then fewer turns; the best 25 are kept. Each shows the enemies killed, turns, lives lost, how it ended, the power-ups held, the date and the seed. Developer runs count, with a red border; Immortal runs don't. A global board and a daily dungeon are planned (PLAN.md §12b).
Game over offers two buttons: Same dungeon (the same seed and modes again, from level 1) and New dungeon (a random seed, same modes).
The choice is remembered for next time, is fixed for the run, and shows as small yellow tags at the start of the top bar's last row (tap them for details) and, by name only, in the menu. Starting a new run while one is going warns that it will be lost.
The run
20 levels. Clearing the last level ends the run with a victory banner: total turns, lives lost and the seed. The game saves after every move (in this browser), so closing the tab and coming back continues the run where you left it.
The top bar
Lives (hearts), level (flag), enemies left, coins, turn / par, your bomb limit, blast size and fuse, then — in their own row — the passes you hold, a Star's countdown, the charge you carry (with its uses left), and a Freeze or Decoy at work (with its turns left). The bar has a fixed number of rows (three on a phone or a narrow screen, one on a wide one), and a row that gets too long scrolls sideways instead of growing, so the board never moves as you pick things up.
Sound and vibration
Turns make sounds, timed with what you see: a pop when a bomb is set down, a boom when it goes off (one louder boom for a chain; an ICBM's when it lands), enemies vanishing, coins and charges picked up, the gem, the exit opening, a hurt, a cleared level; buttons click. Phones that can vibrate (Android; iPhones can't, from a web page) also buzz for blasts, hits, pickups and a cleared level. Both can be turned off in the menu, and the setting is remembered in this browser. The demo and the clips in the dialogs are silent. On an iPhone, the silent switch mutes the game. A phone in Mute mode (on Android, the sound mode in the quick settings) doesn't vibrate either: switch it to Vibrate or Sound.
The board
Boards grow with the level: 9 × 11 on levels 1–3, 11 × 13 from level 4, 11 × 15 from 8, 13 × 15 from 12 and 13 × 17 from 16 (fitted with the balance lab, so a late level takes about as long as an early one, not two or three times as long). You always see 9 × 13 tiles, on a phone and on a desktop alike (bars cover the rest of a wide or tall screen), so no screen sees more of the board than another. A bigger board scrolls with you, smoothly, and stops at its edges. Drag the board (with nothing picked) to look around it; letting go does nothing, and the view stays where you put it through your turns; it follows you again when you would walk out of it, and on a new level. What is out of sight shows at the edge of the view as a small picture with an arrow pointing to it: every enemy, every bomb, the exit and the gem once uncovered, and you, when the view is dragged away. (Every board was 9 × 11, seen whole, until 2026-10-25.) A stone outer wall and metal pillars (indestructible; the pillars change colour from level to level) and wooden crates as soft blocks (destructible). Once the last enemy is gone, every crate crumbles away over 1–3 turns (shaking first), revealing the exit and the gem — not flame, so nothing is punished. (The original's 31 × 13 board with 50 levels was an option until 2026-10-23; so was the crumbling.)
Board objects (since 2026-10-25), each from its own level on, one new kind every few levels, placed from the seed (never on the exit's or the gem's crate, nor near the start). Tap one to read what it does.
| Object | From level | What it does |
|---|---|---|
| Bush | 2 | Walk into it. It hides you: enemies chasing you head for where they last saw you instead. It hides drops lying in it too; an enemy in one shows faint, arrows and all, so nothing that can hurt you is hidden. Flame burns it, and the bushes touching it smoulder (glowing) and catch fire the next turn: a slow fire front. |
| Metal crate | 3 | Grey. Like a pillar, but anywhere: nothing breaks it, nothing gets through (not a Pierce bomb's flame, not Crate Pass); a Nuke's blast goes round it. Placed only where every tile stays reachable. |
| Oil | 5 | A dark, glossy spill, safe to walk on — until flame touches any part of it: then the whole spill burns at once (and lingers a turn, like flame), setting off any bomb lying in it. It is also slippery: step (or run) onto oil and you slide straight on over the spill, stopping on its last tile in that line (or short of a bomb or an enemy), picking up what lies on the way; if the slide ends in flame, you burn. A diagonal step doesn't slide. Every enemy but the flying Ghost and Wisp slips too, and its arrows show where the slide ends. |
| Spikes | 8 | Up one turn, down the next. Up, they cost a life to whoever stands on them (they show in the danger overlay when up). Enemies never step on them. |
| Oil barrel | 11 | A crate with a warning sign: it blocks like a crate. Flame bursts it: oil spills on it and the floor round it, and the next turn it explodes with a blast of 2, lighting the spill. It isn't your bomb: it doesn't count to your limit, and the Detonator can't set it off. |
Keyboard
The whole game plays with the keyboard alone. There are two ways to aim, and they mix freely:
- Plain arrows / W A S D (and Q E Z C diagonally, with Diagonal) take the nearest tile that way for the action: with nothing picked, a step (a kick into a bomb); after M, B, R, K, T ... the nearest tile along that line it can use ("B, then a direction"). Never a move that would cost a life.
- Shift + arrows (or Shift + W A S D) wake the keyboard cursor, the controller's tile-first cursor (see Controller): a dashed square on your own tile that hops between the blue tiles, any of them, not only along your four lines, including the faded blue tiles auto-move can walk to (M or Enter there: "Walk here"); a label over the action bar says what each key does on that tile, and a faded ghost shows the first result. The press that wakes it only shows it. While it shows, M, B, V (Move, Bomb, Charge), R K T P F I L X (an action that is possible there) and Space (Wait, only on your own tile) act on the cursor's tile; Enter does the tile's first action (or confirms the action you picked); Esc backs out one step (what is picked or the flag, then the cursor back to you, then puts it away). It starts on you each turn, or on your destination while auto-move is walking you there ("Keep walking"). A plain arrow, the mouse or a tap puts it away.
- ? is "What is that?": it aims at the nearest tile with something to explain; arrows or Shift + arrows hop between those tiles, Enter or ? again explains the aimed one (its dialog has Walk there for a far tile), Esc stops asking.
- Alt + arrows pan the view (it repeats while held) and Home brings it back to you.
| Key | Does |
|---|---|
| M, B, V, Space | Move, Bomb, Charge, Wait (on the cursor's tile if it shows, else pick, then a direction) |
| R K T G P F I L X | Run, Kick, Throw, Diagonal, Teleport, RPG, ICBM, Slide, Detonate: pick it, then a direction or the cursor |
| Arrows, W A S D; Q E Z C | The nearest tile that way; a diagonal step (with Diagonal) |
| Shift + arrows | Wake the keyboard cursor / hop it; hop the "What is that?" aim |
| Enter | The cursor tile's first action, or confirm the picked action or the aim; presses the end-of-level banner's button; in a dialog, its green (or only) button |
| Esc | Back out one step; with nothing to back out, the menu; closes a dialog |
| Tab, Space / Enter | In a dialog: move between its buttons and press one (Enter alone presses the green one) |
| ? | "What is that?" (Enter or ? again explains the aim) |
| Alt + arrows, Home | Pan the view, follow you again |
Enter and Space belong to a button that has the focus (it presses it) and leave the game alone.
Controller
A gamepad with the standard layout (a PlayStation, Xbox or Nintendo pad, over USB or Bluetooth, in a browser)
plays the board tile first. While the pad is in use a dashed square (the cursor) is always on
the board, starting on your own tile each turn, level and run and after a dialog (or on your destination while auto-move is walking you there, so Go, "Keep walking", is at hand);
every tile you can do something on lights up blue, and the d-pad moves the square between them. Tiles that only
auto-move reaches are a faded blue: the square hops onto them too, and Move/Go there walks (label "Walk here · N steps"; the other face buttons are greyed). Move/Go works on any tile you can walk to, even when it is also a bomb or charge target (an RPG, throw or ICBM landing, say): the bright tile then offers both, Move walks there and Bomb fires. Holding the d-pad
hops fast (first repeat after 250 ms, then every 75 ms), so crossing a board takes a moment. A line over the action
bar lists what the tile offers, one line per button ("Cross Move to this tile", "Square Place a
bomb on this tile", "Circle Wait a turn"), and a faded ghost shows the result of the first one. The
four face buttons are the action bar's: Move/Go (Cross, A), Bomb (Square, X), Charge
(Triangle, Y) and Wait (Circle, B, only on your own tile), with their pictures on the buttons
while the pad is in use. The mapping is by position (bottom Move, right Wait, left Bomb, top Charge) with one
exception, a Nintendo pad, where A is the "go ahead" button and B means "back": Move/Go is A, the right
button, and Wait is B, the bottom one; Bomb (Y, left) and Charge (X, top) stay where they are (FACE_ACTIONS in
ui/padMap.ts; the pictures, the dialogs' confirm and dismiss buttons, the hold-to-play button and the demo's virtual
controller follow). Hold the button to confirm it (Q59): a ring round its picture fills clockwise from 12 o'clock
in half a second, and the action happens the moment the ring is full, while the button is still down (the ring
stays full and green until you let go). That button is then used up: it does not act again, and it starts no new
hold in whatever the action opened (a dialog, the next level, the game after the demo) until you have let go of it.
Letting go early (or the pad leaving, or the window losing focus) does nothing. One face button is held at a
time; another one pressed meanwhile is ignored. The d-pad, LB, RB, View, R3 and Start stay instant, and so do touch, mouse and keyboard.
When it fires, it does that action on the cursor's tile. On the
action bar, the buttons that cannot be used on that tile are greyed (pressing one just shakes it),
and one that would cost a life gets a red outline and a warning mark; it is still done if you press
it. LB puts anything left picked away and brings the cursor back to your
own tile (in "What is that?" it puts the aim on you). A small legend at the top of the board shows the L1/LB and R1/RB pictures, a symbol (an undo arrow, a magnifying glass) and what they do ("Move cursor back to you" or
"Cancel what you picked", dimmed when L1 has nothing to undo; "Activate inspection mode"). RB or View is "What is that?": it aims at what can be explained (pillars and walls too, and the top bar's icons by going up past the top row), the d-pad jumps
between those, and Cross explains it (a single press, since nothing here can hurt; you stay in the mode, to ask about the next thing); Circle leaves it (the action bar is greyed meanwhile, and the label says so). Start opens the
menu (and closes it), R3 brings the view back to you, and the right stick looks around the
board. The left stick does nothing for now. A key, a click or a tap hands the board back to the keyboard
and mouse (just moving the mouse does not); the next pad press brings the cursor back on your tile (a face button pressed then only
shows it, it does not act, and shows no ring).
Dialogs and the screens after a death, a level or a run are played by pad too, so a whole run needs no keyboard or mouse. A dialog's buttons sit on the face buttons, with their pictures on them: the main one (Choose in a gem's choice, Walk there, Take in a charge swap) on Cross (on a Nintendo pad: A, the right-hand button, and the one that leaves is B, the bottom one), the others, left to right, on Triangle then Square, and the one that leaves (Close, Cancel, Back, Got it) on Circle, which closes any dialog that can be closed. Where that does not fit (the menu, the almanac, New run, the changes list) a d-pad selector with a yellow outline moves over the buttons, links and switches, and Cross presses what it is on; it starts on the main button (Resume in the menu, Start in New run), and Circle still presses the one that leaves. In a gem's choice or the shop, the d-pad moves over the cards (which selects them and plays their clip) and Cross takes the selected one (in the shop, Cross buys and Triangle and Square are Restock and Next level). LB and RB (and View) switch the almanac's tabs, and the right stick scrolls a long dialog. The seed field in New run is skipped (type it with a keyboard). The banner's buttons are on Cross, Triangle and Square the same way. In dialogs and on the banner the face buttons are held to confirm too, with the ring round the button's picture (the picture buttons; in a dialog with a selector the selected item shows the confirm button's picture too, a switch, button, link or card alike, and the ring fills round it; the item acts when the ring is full). Let go too early, a toast says "Hold to choose" (once per dialog). In the almanac the tabs before and after the shown one carry the LB / RB pictures.
The demo and the clips in dialogs (the almanac's, the gem choice's, the shop's) show the controller while a pad is in use: the demo and the clips about a move, a bomb or a power-up show a small virtual controller lighting up the buttons and a dashed cursor, instead of the finger (see The demo). A clip changes with the input at its next loop.
Running it
npm install
npm run dev          # http://localhost:5173 — also prints a QR code to open it on a phone on the same Wi-Fi,
                     # and the game's console output and errors, from any device, in this terminal
npm test             # Vitest
npm run build        # type-check and build into dist/
npm run preview      # serve dist/ (also on the network, with a QR code), as it will be deployed
npm run screenshots  # build, then photograph the game into docs/screenshots/ (Playwright)
npm run balance -- help   # the balance lab: bots play many games to measure the rules (below)
npm run report-replay -- <mail.eml>   # a bug report's run as a replay URL (below)
Replaying a bug report (Q103, dev only): npm run report-replay -- "<the report mail>.eml" finds the
report's run record (a bare record or any text holding a Run record: {…} line works too), stores it in
replays/ (git-ignored, private) and prints an address such as
http://localhost:5173/?replay=seed1464004408-v43-290 for npm run dev. The page loops the last
level's last turns with two players on one board, a little off the tile's centre: red (left)
plays the report's recorded turns (the replay), blue (right) plays the same turns until the autopilot
took over and then today's autopilot (the simulation). Both take a turn at a time; the label says
how many turns they stay on the same tile and when they split, and at the end how each finished (alive,
dead, lives left). The board shown is the replay's; the simulation's bombs are outlined in blue. The page takes no input (pointer, keys, touch and pad are all stopped; it plays alone).
Two versions of the rules over a whole run: the script also prints
...?replay=<name>&rules=<commit> for the commit the report says it was made on (or --rules <commit>).
It takes that commit's src/sim out of git into rules-versions/<commit>/ (git-ignored) and plays the
report's whole run through both engines, red under the old rules and blue under today's, the same
recorded turns each. Where the games agree it jumps through; from six turns before the first turn where
they differ (player, status, lives, level, enemies, bombs, coins) it plays each turn, until 15 turns after it, and the
label names the difference ("5 vs 6 lives"). A turn one version's rules refuse stops that side there. If
they never differ, it says so and plays the last 8 turns. The logic is sim/ruleCompare.ts
(compareRules, tested with stand-in engines). The autopilot comparison above is sim/replayCompare.ts (tested with the Q101 report in test/fixtures/);
the page is in main.ts, served by a dev-server plugin in vite.config.ts, and is not in a build.
The balance lab (tools/balance/, PLAN.md §19.1) measures what a rule or a power-up does to
the game. Bots play the real rules in Node, on all CPU cores, at three skill levels: careful
(checks every turn that it can survive what the enemies and bombs will do next; wins about 90% of
runs), average and sloppy (look fewer turns ahead and slip now and then; they clear about
5 and 3 levels). An experiment plays the same seeds once per arm, so differences come from the
change, not the boards, and reports each with a 95% interval in docs/balance/:
npm run balance -- powers --skill careful— each power-up held from level 1, against none.npm run balance -- structure— what each power-up changes on real positions, no bot judging: how many bomb placements can be survived, tiles reachable in 3 turns, safe actions.npm run balance -- underfoot— bombs next to the player (the rule) against under them (the original's rule; a lab-only switch). Results below.npm run balance -- runsandnpm run balance -- trace <seed> <level>— the bot's play, run by run or board by board (--arm <name>plays a power-up or rule variant).
Options: --seeds N (200 by default), --skill careful|average|sloppy, --levels N. The 3,600
runs of powers take about 10 minutes on 10 cores.
Measured: bombs under the player (2026-10-26)
In the original, a bomb goes down on your own tile; here it goes on a tile next to you. To see what the original's rule would change, the lab played both on the same 200 seeds (reports: careful, average). Under the original's rule you walk off your bomb and can't walk back; enemies can't step onto it, so not onto you while you stand there. Differences from the current rule (✱: larger than chance):
| Bot | Rule | Levels cleared | Won | Lives lost | Turns per level | Turns in danger | Stuck |
|---|---|---|---|---|---|---|---|
| careful | next to you (current) | 19.3 | 93% | 0.24 | 83 | 5.4% | 4% |
| careful | under you (original) | −0.6 | −6% ✱ | +0.12 | +12 ✱ | +5.0 points ✱ | 8% |
| average | next to you (current) | 4.1 | 0% | 3.00 | 76 | 3.4% | 0% |
| average | under you (original) | +0.6 ✱ | 0% | ±0 | +9 ✱ | +9.3 points ✱ | 1% |
What it would change:
- Slower: 10–15% more turns per level. Every bomb starts with you inside its blast, and getting out takes moves; next to you, you start a tile away.
- Riskier: about twice the turns spent on tiles about to burn, and the careful bot dies to its own blasts about twice as often.
- A little kinder to weaker play: the average bot clears 0.6 more levels. Standing on your bomb keeps enemies off you, and you can't shut your only way out by dropping a bomb into it.
- Cornered enemies get harder: to bomb an enemy at the end of a dead end, you have to stand in the corridor's blast line and still get out in time. Half of the careful bot's lost wins are such levels; the other half are it refusing to spend a life when boxed in (a person would bomb their way out).
Decided (2026-10-26): bombs stay next to you. The original's rule is a fair choice, not a balance risk — it trades pace for the classic feel — but the current rule keeps turns quick. What the original's rule did have going for it, never being stuck with nowhere to put a bomb, is covered by boxed in (see Lives): it costs a life instead of leaving you stuck.
URL parameters: ?seed=123 plays a fixed board; ?level=4 starts at a later level (level 19
has all seven enemy types); ?charge=nuke (or any charge) starts carrying that charge, for
trying it out; ?level=3&shop opens the shop after that level straight away, with 9 coins; ?dev and ?immortal set the modes; ?demo shows the demo, which test URLs otherwise skip (with ?seed, the same demo every time). ?fps shows a frame-rate meter in the bottom left corner: frames a second, the slowest frame, the game's own time per frame, and the canvas size. For tracking down slowness on a device: ?gl=0 draws with Canvas 2D instead of WebGL (no demo TV effect, no clips), ?ratio=1 draws at one pixel per CSS pixel, ?aa turns WebGL's antialiasing on (it is off: it held Android Chrome to 12 fps). These four keep your saved run. A URL with any of these parameters plays a test board: it doesn't load or overwrite your
saved run.
Deployed to https://apps.fuzzyworld.net/explodorama/ with fw deploy; CI (.fw-ci.yml) checks every push.
Installing it: the game is an installable web app (static/manifest.webmanifest, icons in
static/icons/, built by tools/compose-icons.sh). In Chrome or Edge, use the install button in
the address bar (or the menu's "Install"); on Android, "Add to Home screen" / "Install app"; on an
iPhone or iPad, Safari's Share → "Add to Home Screen". It then opens in its own window, full
screen on a phone. A small service worker (static/sw.js, network first) keeps a copy of
everything it has loaded, so once played it also starts offline; online, it always loads the
latest version.
How it's built
src/sim/— all the game's rules, in plain TypeScript with no rendering. Deterministic: every random choice comes from the seed.step(state, action)plays one turn and returns the new state plus a list of events. The danger overlay runs the same code as a real turn, so it cannot disagree with what happens.src/render/— draws the board with LittleJS (pinned to an exact version, using its WebGL renderer).src/render/sprites.ts— the sprite list. The art lives inassets/kenney/under the pack's own file names.src/ui/— the HUD, action bar and banners, as plain HTML, using the same sprites as icons.- Every run is recorded as its seed plus the list of actions, which replays to the identical state. This will become mid-run saves, replays and victory certificates.
Design and decisions: PLAN.md, decisions.md.
Attribution
Art: New Platformer Pack 1.1, UI Pack 2.0 (with its Kenney Future font) and UI Pack: RPG Expansion, Game Icons and Board Game Icons and Crosshair Pack (the controller's target square) and Input Prompts (the controller buttons on the action bar, in dialogs and on the banner, and the d-pad, right stick and Start / Options / Plus pictures of the demo's virtual controller), all by Kenney, under CC0 (public domain), the Splat Pack (the oil spills) and Foliage Sprites (the bushes). Kenney doesn't require credit, but the pack was chosen deliberately and the game looks the way it does because of it, so it is credited here (it was in the game's menu until 2026-10-31). Thank you, Kenney! Support his work at https://www.kenney.nl/donate.
The files used are copied, unchanged and under their original file names, into
assets/kenney/, assets/kenney-icons/ and
assets/kenney-board-icons/ (Game Icons and Board Game Icons),
assets/kenney-crosshair/ (one dashed square),
assets/kenney-input-prompts/ (69 button and key pictures: the controller buttons and, from Keyboard & Mouse, 15 keys of the keyboard demo's key overlay),
assets/kenney-ui/ (keeping the pack's
colour folders), assets/kenney-ui-rpg/ and
assets/kenney-splat/ (a few of the Splat Pack's splats, scaled down to
128 px) and assets/kenney-foliage/ (six of Foliage Sprites' white
shapes, which tools/compose-icons.sh tints green and outlines into assets/composed/grass_* and
canopy_*), each with its pack's licence file. One exception: the demo's pointing hand, assets/kenney-ui-rpg/cursorHand_beige.svg,
is the RPG Expansion's cursorHand_beige cut out of the pack's vector sheet
(Vector/uipack_rpg_vector.svg: just its three shapes, unchanged), since the PNG is only 27 px
across. The mouse demo's pointer is cursor_none.png from Kenney's Cursor Pack (assets/kenney-cursor/), and the fullscreen button's two icons are Game Icons' larger and smaller (black, 2x). They
are not covered by this project's MIT licence. Who made every picture and sound, and what Claude drew
by hand, is listed in docs/art-provenance.md.
The controller line drawings in the demo's virtual controller are OpenGameArt's
Controller style 1,
3 and
5 by xUMR, under
CC BY 4.0; scaled down and trimmed; they are in
assets/controller-art/.
Sounds: the New Platformer Pack's 10 effects, in assets/kenney/sounds/,
and the UI Pack's tap-a and switch-a, in assets/kenney-ui/Sounds/,
under their own names but converted from the packs' .ogg to .mp3, since older iPhones can't
play Ogg. The blast, a bomb set down and the ICBM's launch are made in code with
ZzFX, through LittleJS.
Licence
MIT — see LICENSE. Kenney's art is not covered by it (see Attribution above).
Contributing
See CONTRIBUTING.md. What has changed so far is in CHANGELOG.md.